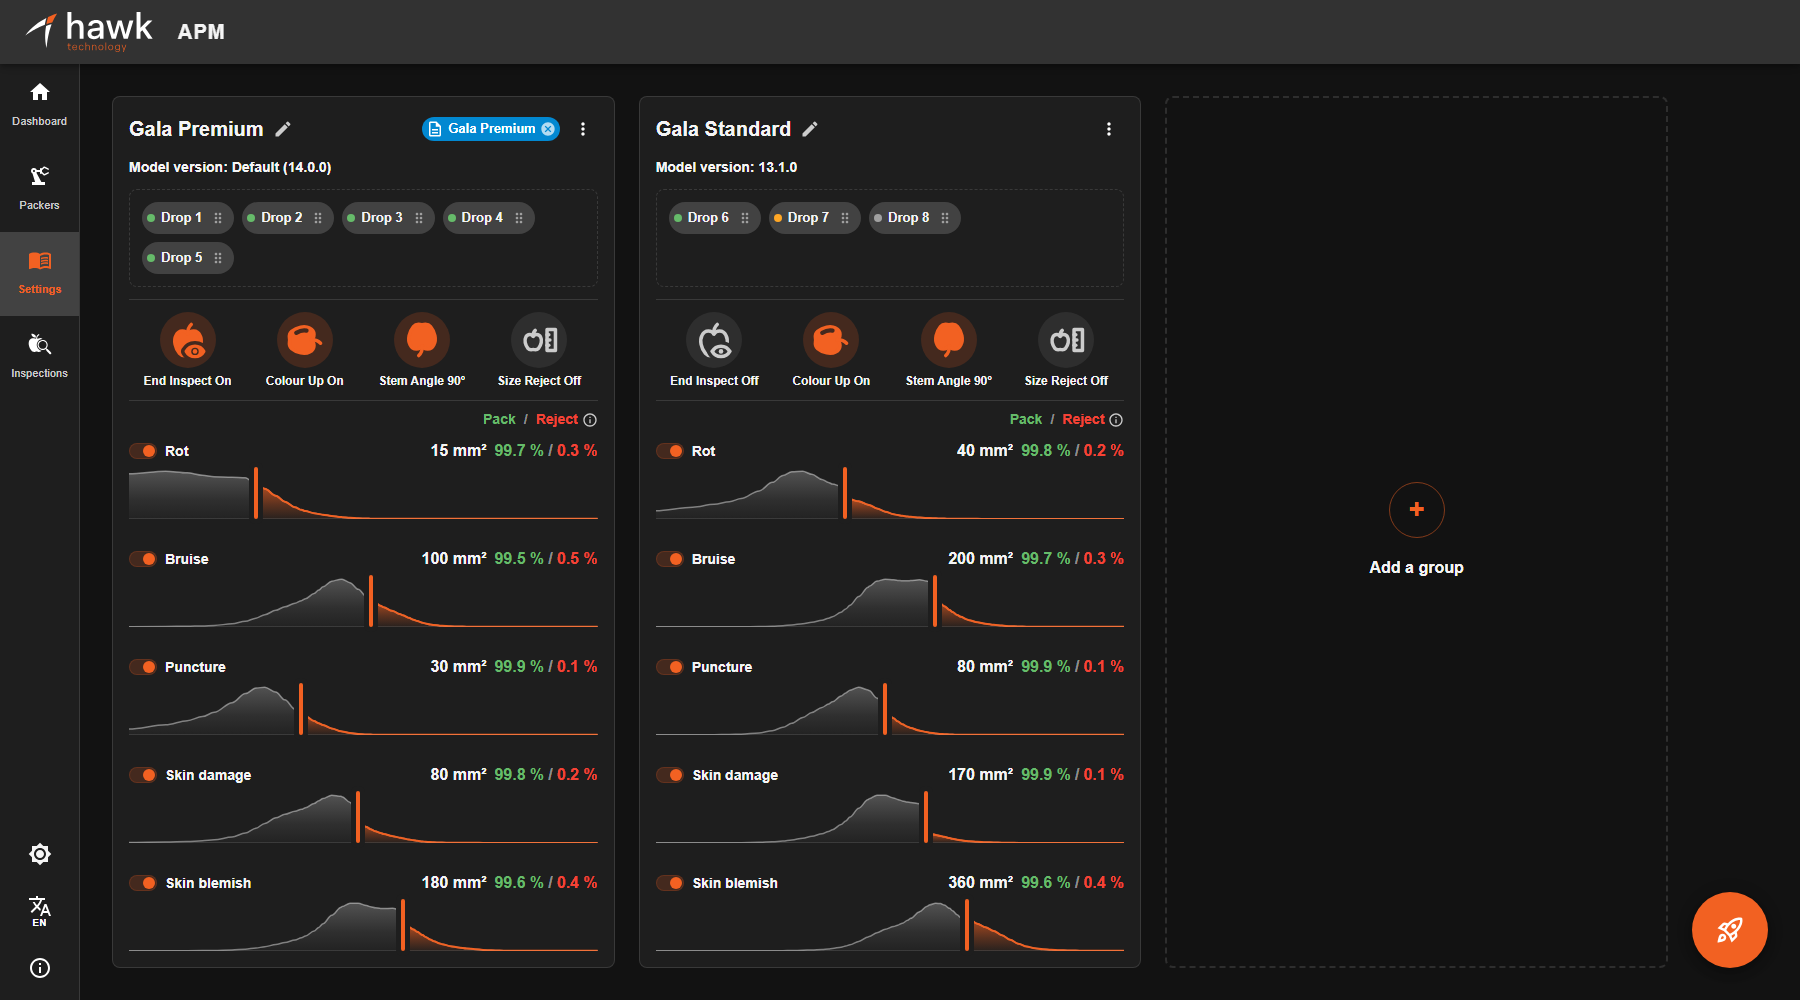
Figure 1 — The Settings page with two outlet groups
The Settings page is where RAP settings are configured. Instead of setting up each outlet on its own, outlets are gathered into outlet groups. Each group holds one set of settings, and every outlet in the group runs those settings.
¶ Introduction
This guide is for supervisors and operators who set up RAPs for a run: choosing the settings for each part of the line, moving outlets between groups, and deploying the changes to the machines.
¶ Key concepts
| Term | Meaning |
|---|---|
| Outlet | A sizer outlet with a RAP on it, often referred to as a lane or drop. |
| Outlet group | A named set of outlets that share one set of settings. A packhouse can have up to three groups. Every outlet is in exactly one group. |
| Group settings | End Inspect, Colour Up, Stem Angle and the defect thresholds. Settings apply to the whole group, and every outlet in the group has those settings deployed. |
| Draft | Your changes on the Settings page before they are deployed. Nothing is deployed to a machine until you click Deploy. |
| Template | A saved set of settings, e.g. Gala Premium, that can be loaded into any group. Loading a template copies its settings to the selected group. The group keeps its own name. |
| RAP status | The current status of the RAP, shown as a coloured dot on the outlet's chip. |
| Model version | The version of the defect model a group's RAPs run. The defect model is the software that finds defects in the fruit. See Model version. |
¶ Settings page layout
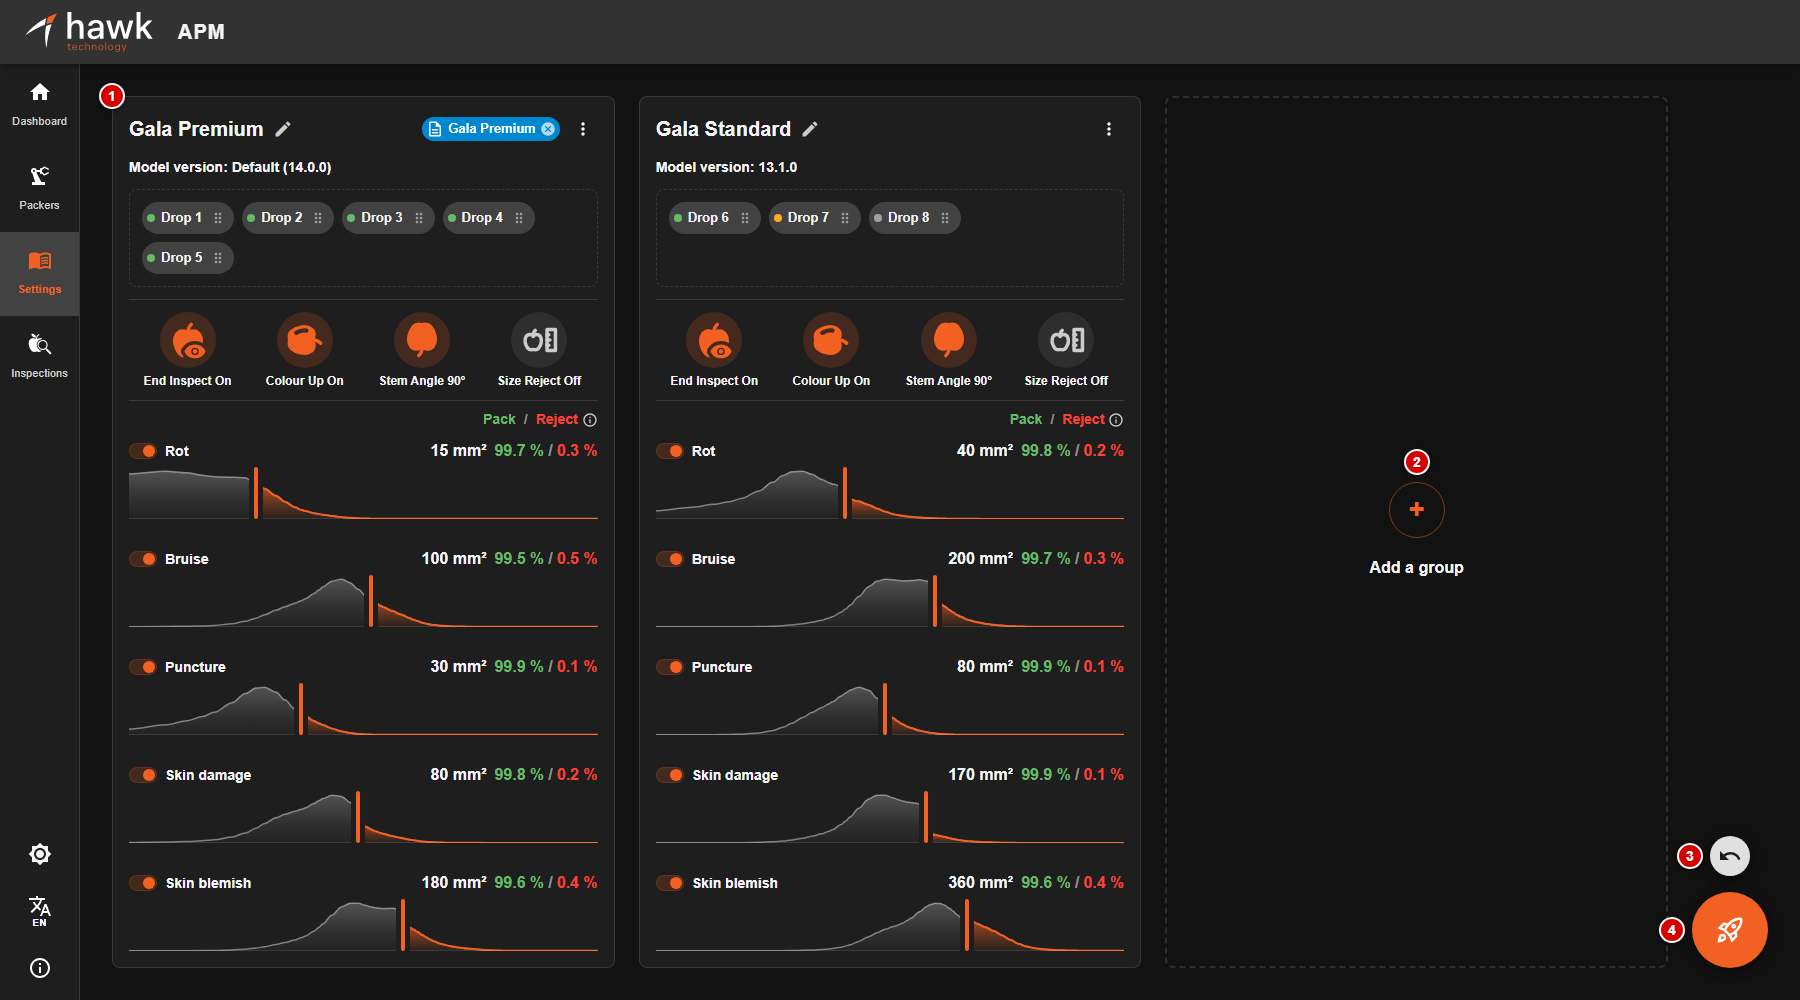
Figure 2 — The Settings page layout
- Group card. One card for each outlet group. See Reading a group card.
- Add a group. You can add up to three groups.
- Discard. The small undo button above Deploy. It reverts the drafted changes made since the last deploy, and only appears once draft changes have been made.
- Deploy. The round orange rocket button at the bottom right. It deploys the changes to the machines. Hover over it to see how many machines the settings will be deployed to, e.g. Deploy to 1 machine, or No changes to deploy when there is nothing to deploy. While a deploy is in progress, it shows a spinner. See Deploying changes.
¶ Reading a group card
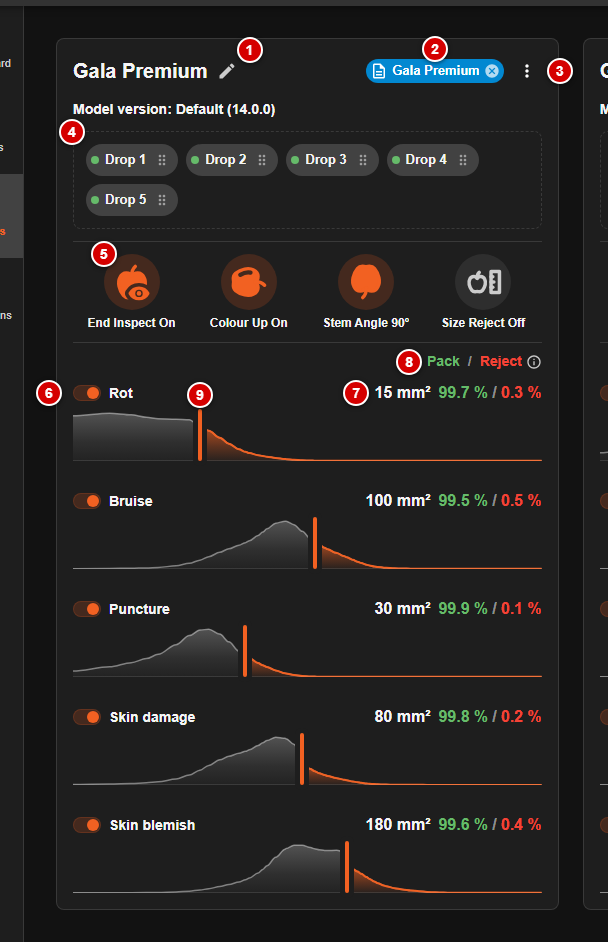
Figure 3 — A group card
Under the group name, the card shows which model version the group runs, e.g. Model version: Default (14.0.0). See Model version.
- Group name. Click the pencil icon to rename the group.
- Template chip. Shows the template the group follows. An asterisk (
*) on the chip means the group's settings have changed since the template was loaded or saved. Click the × on the chip to unlink the group from its template. See Templates. - Group menu (⋮). Load and save templates, choose the model version, clear the charts, or remove the group. See Group menu.
- Outlets. One chip per outlet in the group, each with its RAP status dot. Drag a chip to move the outlet to another group. See Arranging outlets.
- Settings. End Inspect, Colour Up and Stem Angle, each shown as a button with its current value underneath. Click a button to change its setting, or hover over it to adjust it. An orange button means the setting is on; a greyed-out button means it is off.
- Defect switch. Toggles rejecting for this defect on or off.
- Threshold. Every fruit with a defect larger than this size (in mm²) will be rejected.
- Pack / Reject. The percentage of recently measured fruit that would be packed (green) and rejected (red) at this threshold. Hover over or click the ⓘ beside the key to see what the charts show.
- Threshold handle and fruit distribution. Drag the handle to set the reject threshold for this group, which is deployed to its outlets. The chart shows the distribution of fruit measured on the group's outlets. See Changing a group's settings.
¶ Group menu
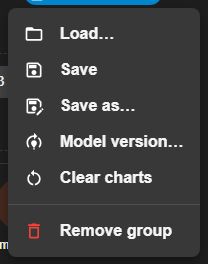
Figure 4 — The group menu
Click the three-dot (⋮) button at the top right of a group card to open its menu:
| Menu item | What it does |
|---|---|
| Load… | Loads a template's settings into the group. See Loading a template. |
| Save | Saves the group's settings to the template it follows. See Templates. |
| Save as… | Saves the group's settings as a new template. See Templates. |
| Model version… | Chooses which version of the defect model the group runs. See Model version. |
| Clear charts | Starts the group's charts afresh. See Clearing the charts. |
| Remove group | Removes the group, moving any outlets in it to another group. See Removing a group. |
¶ RAP status

Figure 5 — RAP status colour codes
Every outlet chip carries a coloured dot showing the current status of the RAP, compared with its group's settings:
| Dot | Status | Meaning |
|---|---|---|
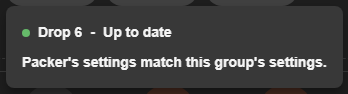
| Green | Up to date | The RAP's settings match this group's settings. |
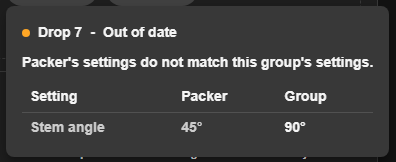
| Orange | Out of date | The RAP's settings are out of date and do not match this group's settings. To bring the RAP up to date, deploy the settings. |
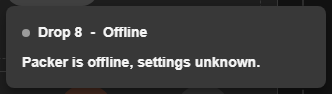
| Grey | Offline | The RAP is offline. Settings cannot be deployed to it. |
The dots show what each RAP last reported, and refresh every few seconds. An outlet only turns green once new settings are deployed and its RAP reports them as successfully applied.
¶ Checking a RAP's status
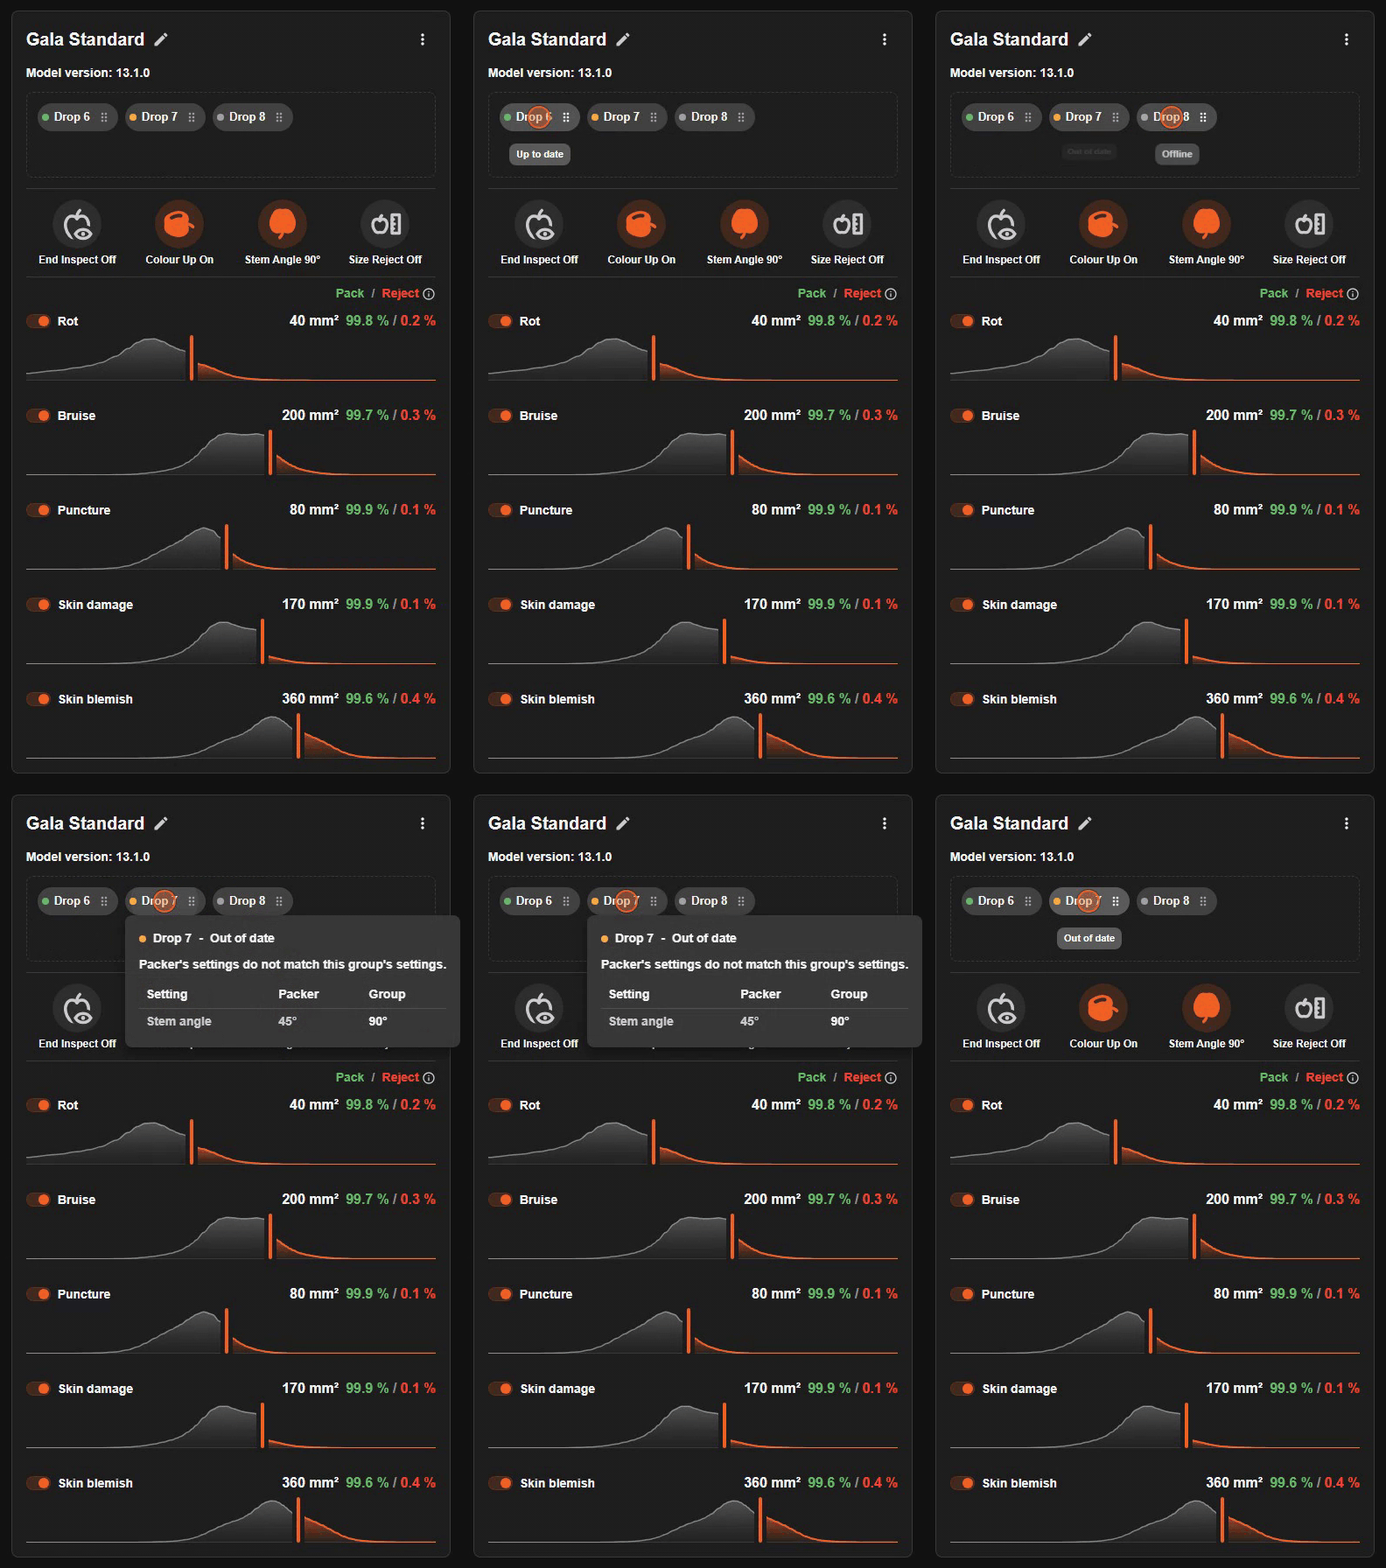
Figure 6 — Hovering over and clicking outlet chips
Hover over a chip to see its status. Click it to see the full status:
| Up to date | Out of date | Offline |
|---|---|---|
 |
 |
 |
For an out-of-date RAP, a table lists each setting that differs: what the Packer is running beside what the Group says. The recipe is read from the RAP when you open it, so its thresholds may take a moment to appear.
¶ Arranging outlets
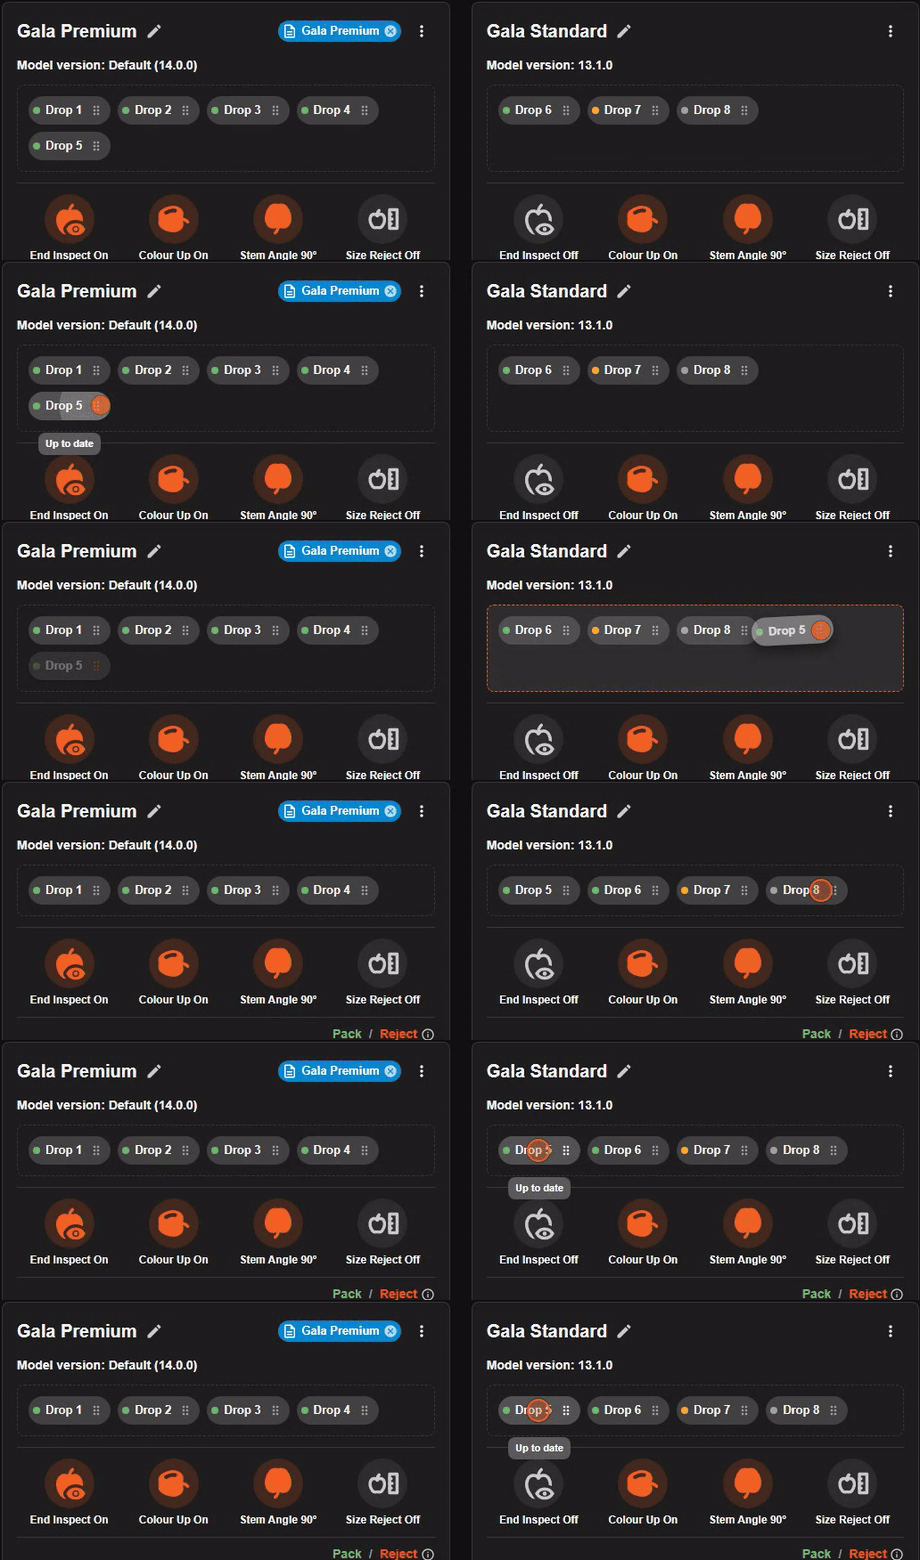
Figure 7 — Moving an outlet into another group
¶ Moving an outlet to another group
- With a mouse: drag the chip by its grip (⠿) and drop it in another group's outlet area.
- On a touchscreen: put your finger on the chip and move it. The chip is picked up straight away and follows your finger. A swipe that starts on a chip moves the chip rather than scrolling the page.
After moving an outlet to a new group, the new group's settings need to be deployed with the Deploy button (the orange rocket at the bottom right). Until you click Deploy, the RAP keeps the settings from its previous group.
¶ Adding a group
Click Add a group to create a new group. You can have up to three groups. A new group starts with every defect layer switched off, so it packs everything until thresholds are manually set. Its charts appear as soon as an outlet is moved into it.
¶ Removing a group
Open the group's menu (⋮) and choose Remove group. There must always be at least one group, so the last one cannot be removed.
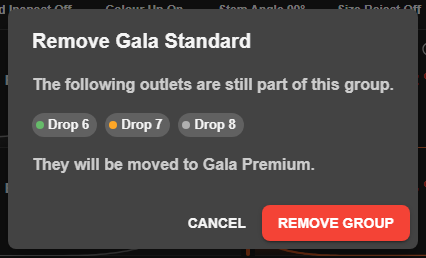
Figure 8 — Removing a group that still has outlets
An empty group is removed straight away. If you remove a group that still contains outlets, a dialog appears and lets you choose which group they should move to. If there is only one other group, the outlets move to it automatically. Either way, the removal is a draft change, and nothing is deployed to a machine until you click Deploy.
¶ Changing a group's settings
All setting changes are draft changes: they show on the card straight away, but are deployed to the machines only when you click Deploy.
¶ Settings buttons
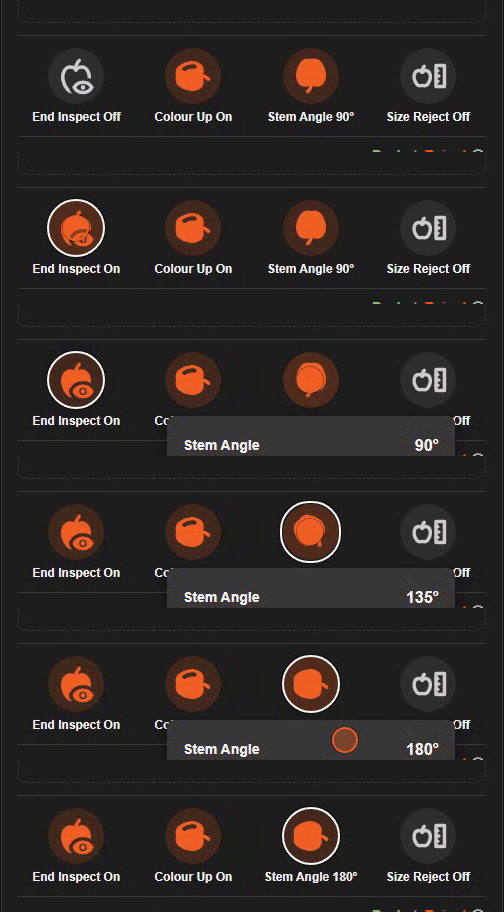
Figure 9 — Switching End Inspect on and stepping the Stem Angle
| Setting | How to set it |
|---|---|
| End Inspect | Click to switch stem and calyx inspection on or off. |
| Colour Up | Click to switch on or off. |
| Stem Angle | Click to step to the next angle, or hover to open a slider. The angle is set in 45° steps from −135° to 180°, and the apple on the button turns to match the selected angle. |
While a setting's panel is open, you can also use your keyboard's arrow keys to change its value.
¶ Defect thresholds
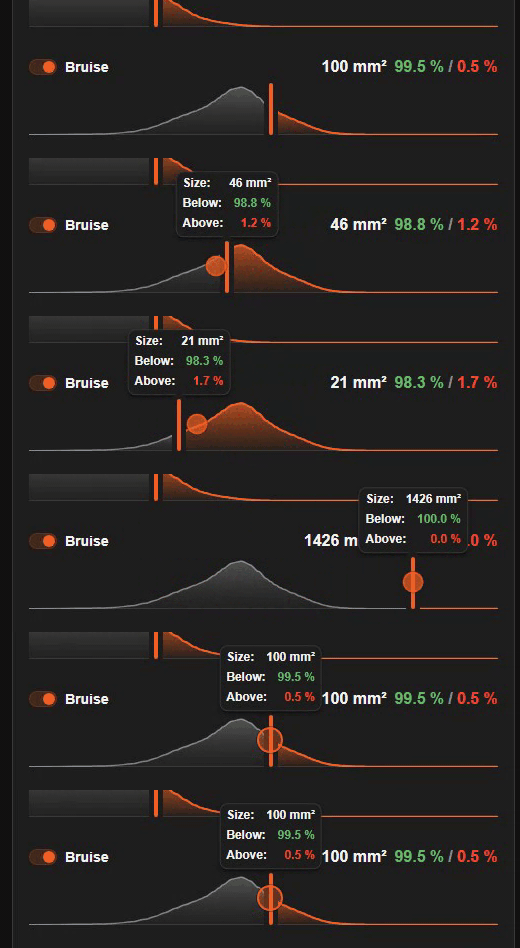
Figure 10 — Setting a defect threshold
Each defect has its own row:
- The toggle switch turns rejecting fruit with that defect on or off. If the toggle is off, the RAP rejects no fruit for that defect. Its threshold is kept, so switching it back on restores it.
- The threshold is set by dragging the handle on the chart. The scale runs from 5 mm² to 7000 mm². It is stretched at the small end, so small defect sizes are easier to set precisely.
- Pack / Reject shows, for the fruit measured recently, the share that would be packed (green) and rejected (red) at this threshold. Both percentages are of all fruit measured, not just the fruit with that defect.
- Hovering over the chart shows the result of a threshold at that point, without moving the handle or changing the threshold.
¶ Deploying changes
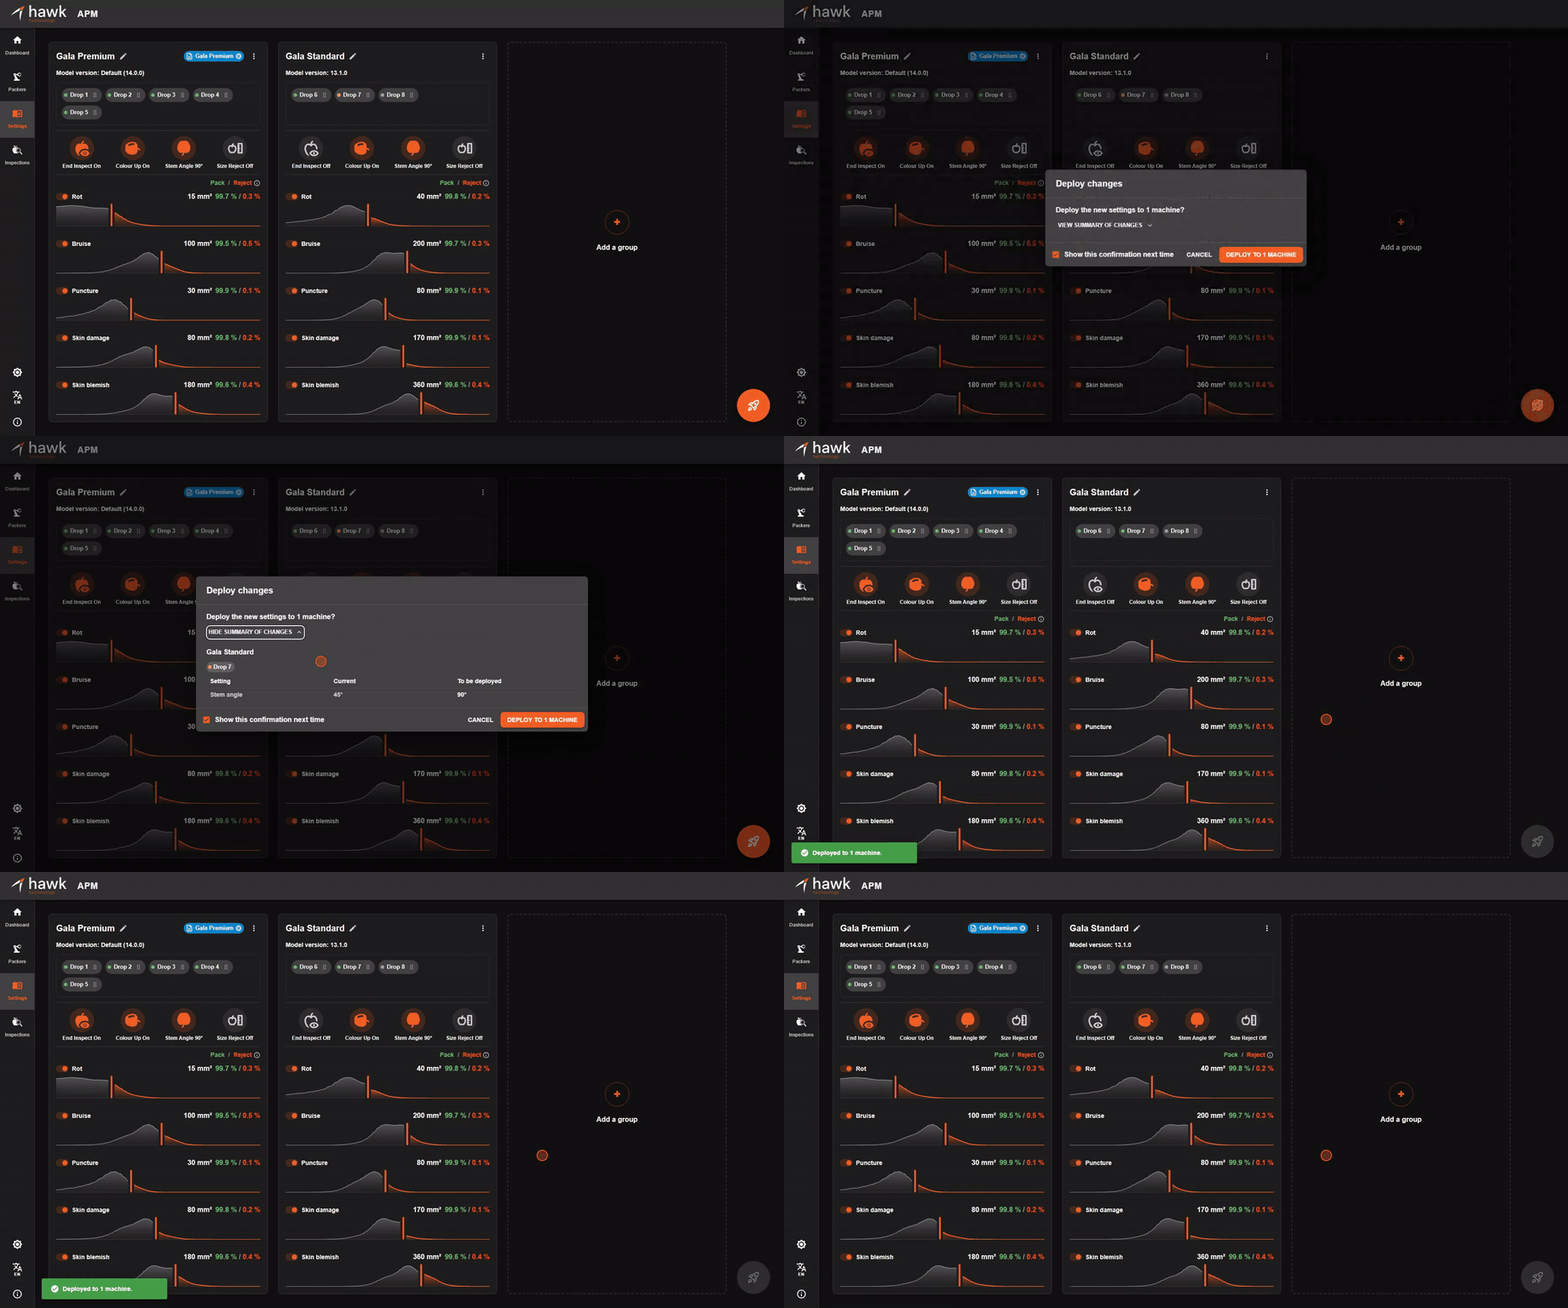
Figure 11 — How to deploy changes
¶ Confirming
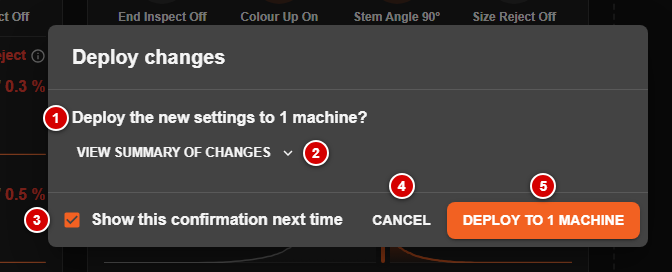
Figure 12 — The Deploy confirmation
- Confirmation. Shows how many machines new settings will be deployed to, e.g. Deploy the new settings to 1 machine? Any offline machines are named here; they will not be updated.
- View summary of changes. Opens the detailed changes. See Reviewing the changes.
- Show this confirmation next time. Untick this to deploy straight away, without this confirmation, from then on. The choice is remembered in this browser.
- Cancel. Closes the dialog without deploying settings to machines; your changes stay on the Settings page as a draft.
- Deploy. Deploys the settings.
Deploying also updates any out-of-date RAP to its group's settings, so it can be used to update out-of-date RAPs even when nothing has been edited.
¶ Reviewing the changes
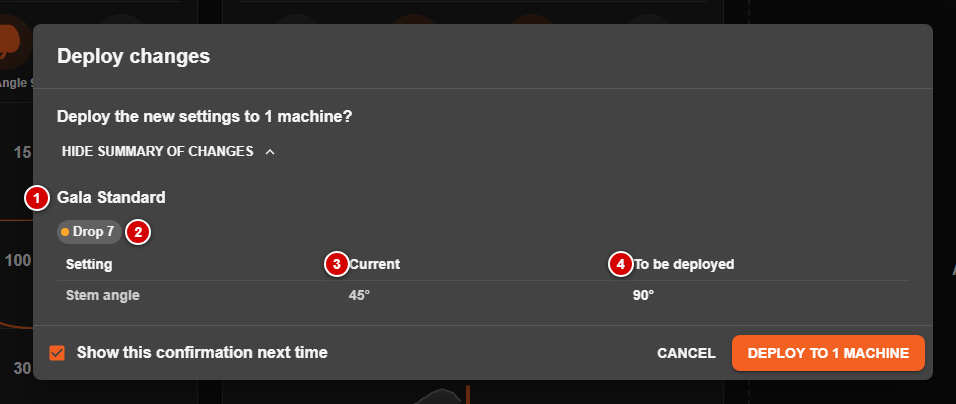
Figure 13 — The summary of changes
- Group. Changes are listed group by group.
- Machines. The RAPs listed above each table are the ones it applies to.
- Current. The current settings the RAP is running.
- To be deployed. The new values that will be deployed to the RAP.
If several RAPs in a group have the same change, it is listed only once, with all of those RAPs above it.
¶ After deploying
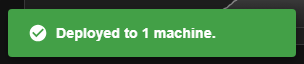
Figure 14 — The message after a successful deploy
When you confirm, the dialog closes straight away and the Deploy button shows a spinner while the settings are deployed. A message at the bottom left of the screen then says how it went:
| Message | Meaning |
|---|---|
| Deployed to 1 machine. | The settings were deployed successfully to every machine listed. |
| Not deployed to Drop 7: … | The settings could not be deployed to that machine; the reason follows. The message ends Deploy again to retry. |
| Drop 8 is offline and was not updated. | The RAP was offline, so nothing was deployed to it. |
| Nothing was deployed. | The deploy did not go through at all; the reason follows. |
The status dots update within a few seconds to show the new status of each RAP.
¶ When someone else deploys while you are working
If another operator deploys changes while you are editing, an information banner shows Another user has made changes. You can't deploy until you reload, and reloading loses your edits. If you click Deploy anyway, the Someone else deployed first dialog explains that nothing was deployed. Reload and lose my edits loads the changes the other operator deployed. You can then start editing again.
¶ Templates
Templates are loaded and saved from each group's group menu:
| Menu item | What it does |
|---|---|
| Load… | Opens the template list. The template's settings replace the group's settings in the draft. The group keeps its name. No changes are deployed to a machine until you click Deploy. |
| Save | Saves the group's settings to its template as a new version. Unavailable until your group has loaded a template. |
| Save as… | Saves this group's settings as a new template. A template needs a name, and a description is optional. The group then follows the new template. |
Save and Save as… take effect immediately but do not deploy anything to the machines.
¶ Loading a template
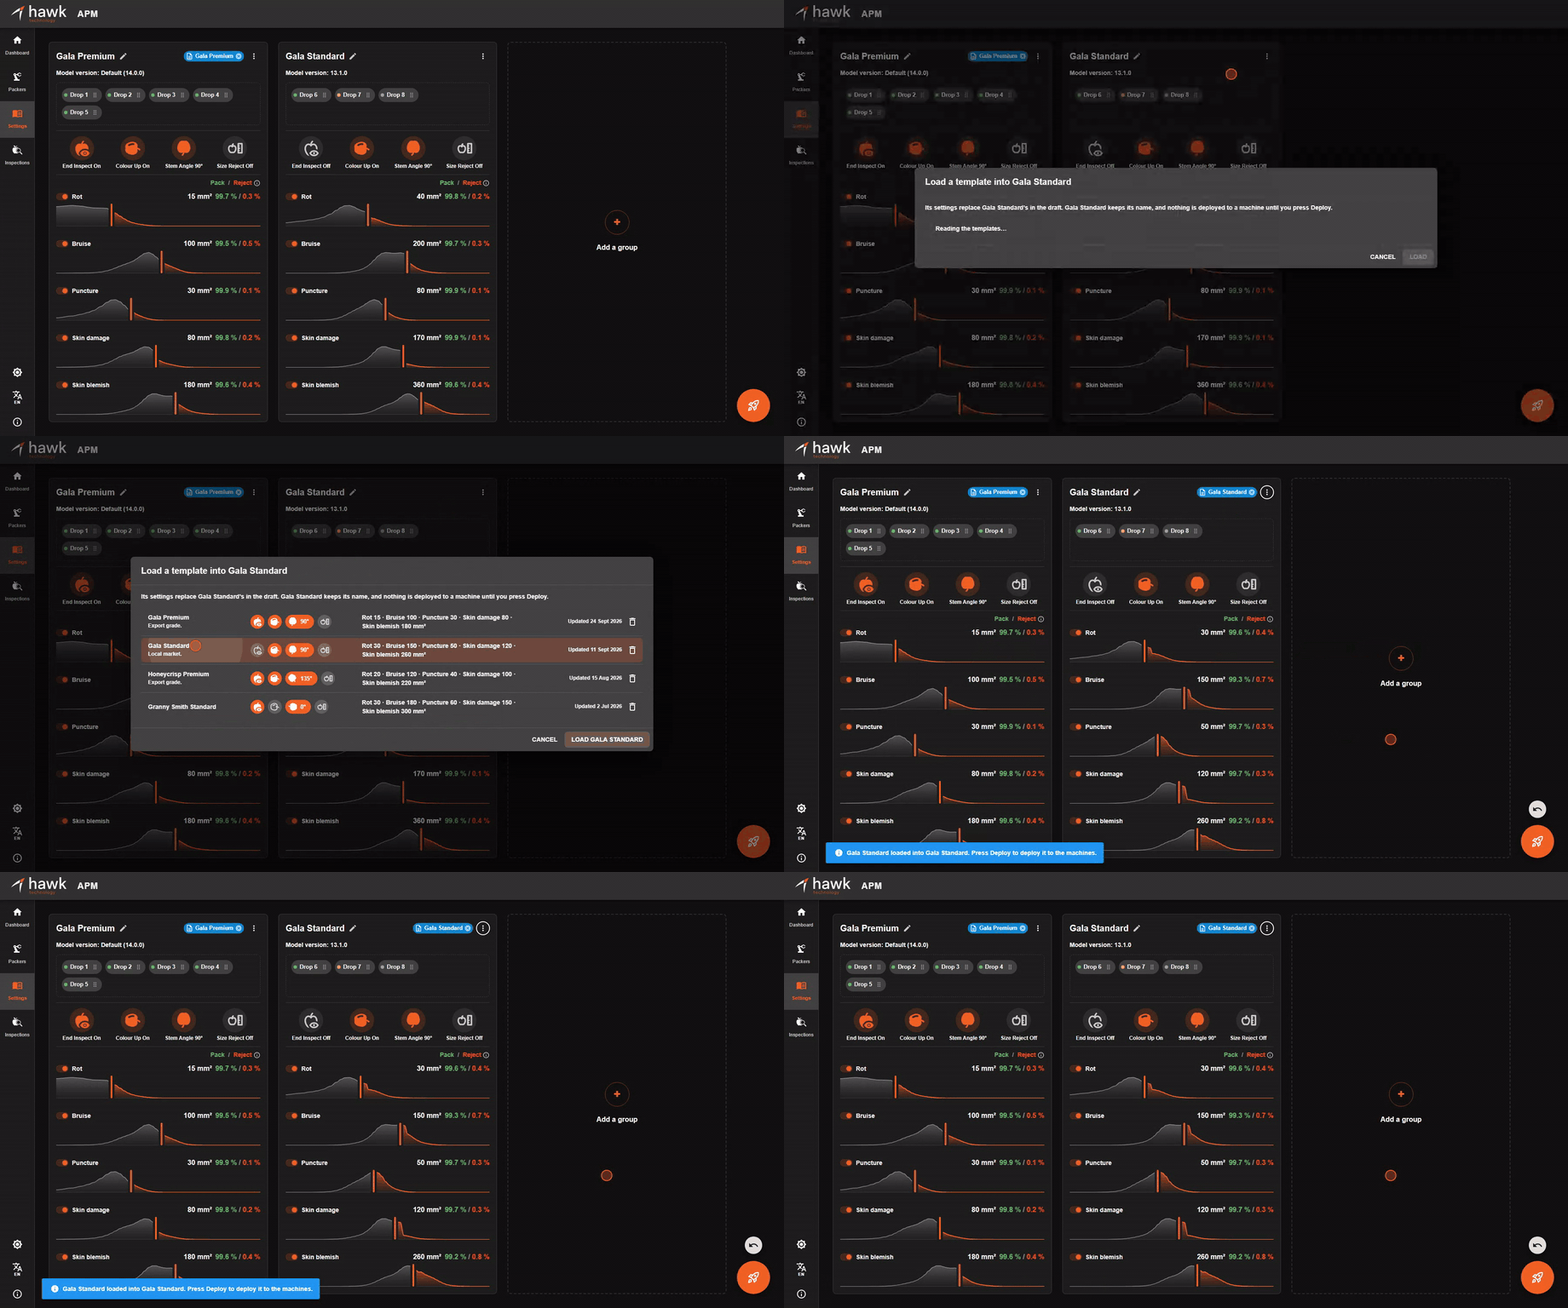
Figure 15 — Loading a template into a group
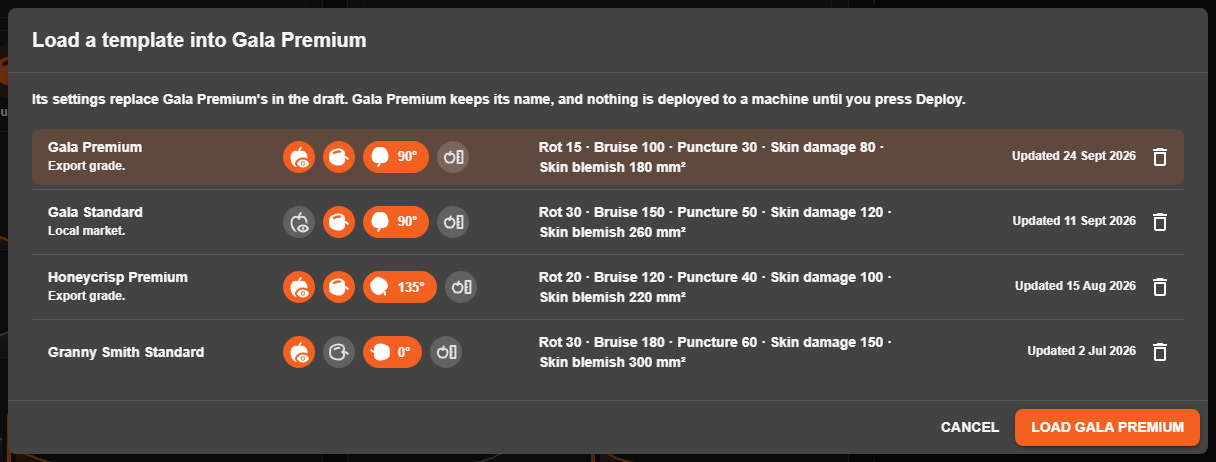
Figure 16 — The template list
The list shows each template's name and description, its settings, its defect thresholds and when it was last updated. The template your group follows is already selected when the list opens. To load a template, double-click it, or select it and click Load.
¶ Unlinking a template
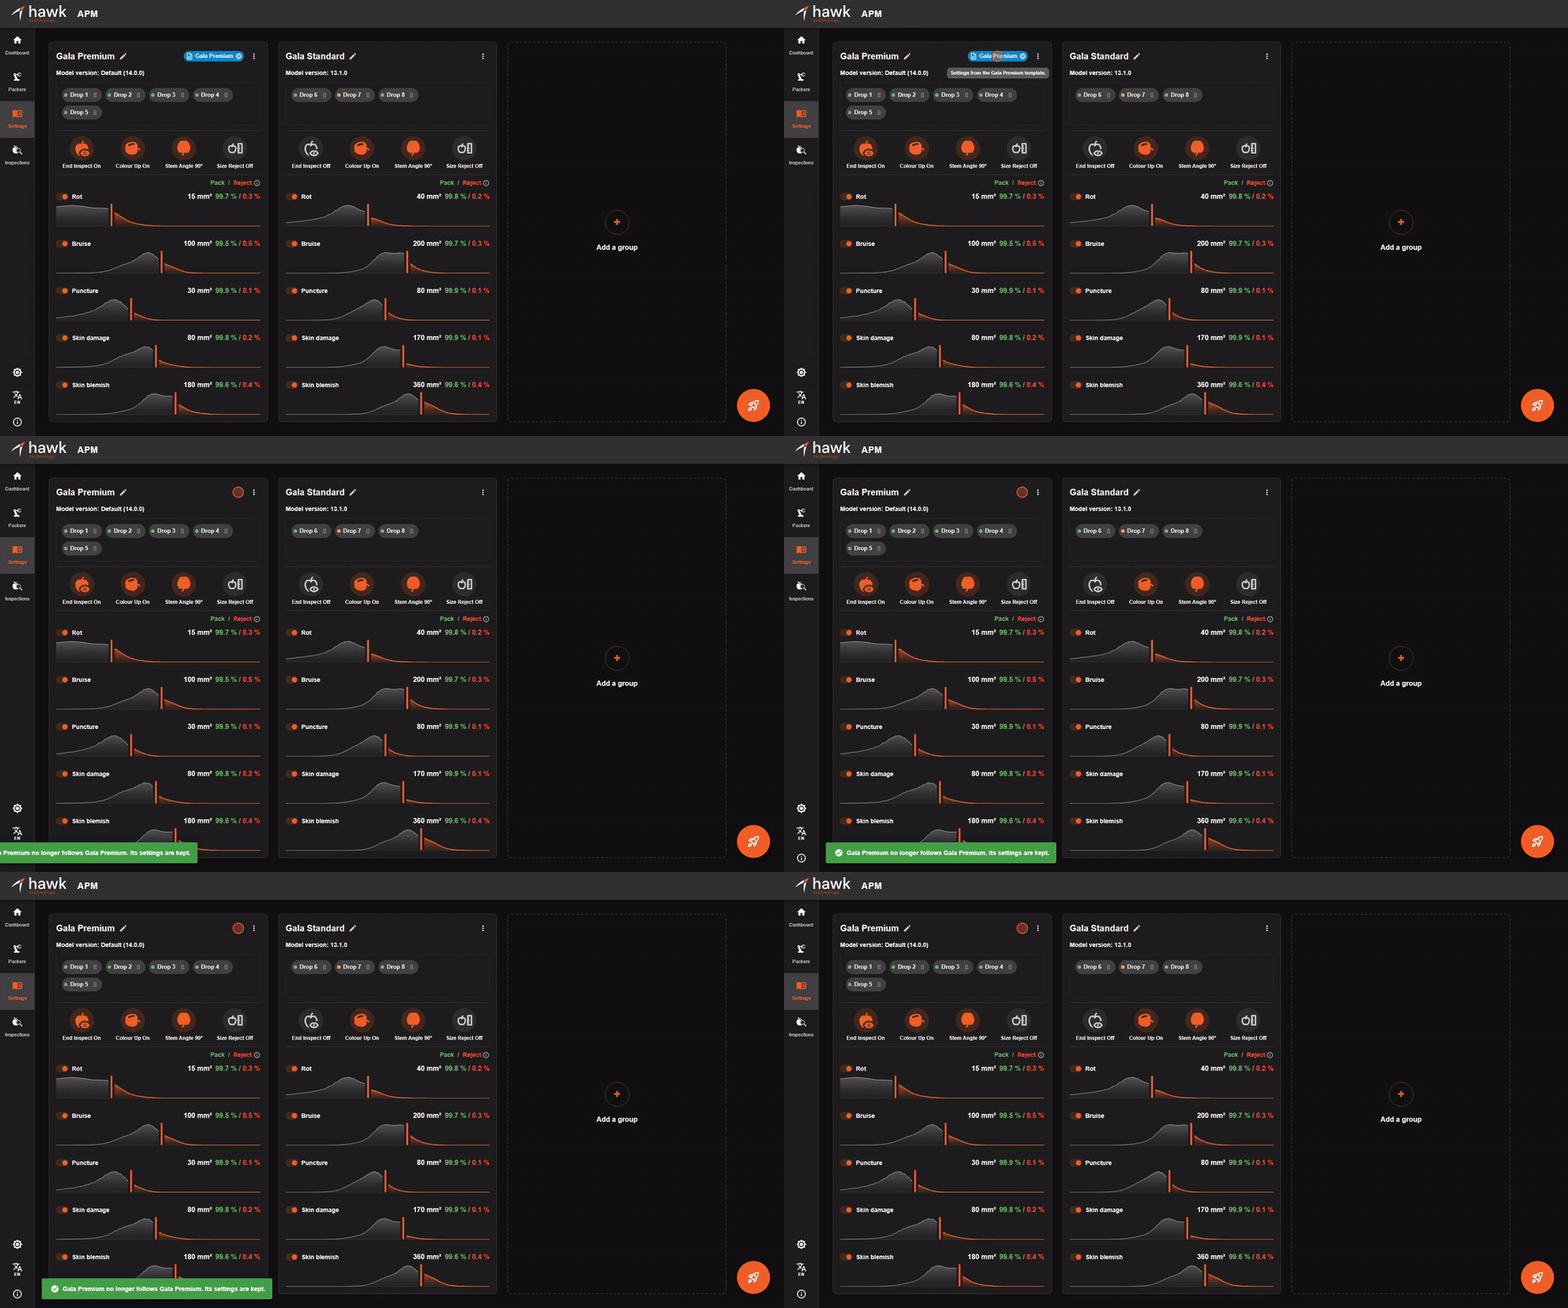
Figure 17 — Unlinking a group from its template
Click the × on a group's template chip to stop the group following that template. The group keeps its settings, and a message confirms it, e.g. Gala Premium no longer follows Gala Premium. Its settings are kept. Unlinking takes effect immediately and does not deploy anything to the machines.
¶ Deleting a template
Click the bin beside a template and confirm to delete it. Groups that followed it keep their settings; they simply stop showing the template as a chip.
¶ Charts
The charts on each card show the fruit measured on that group's outlets over the last 30 minutes, and refresh every minute. They follow the outlets currently shown in the card, so moving an outlet in or out redraws them straight away, before anything is deployed.
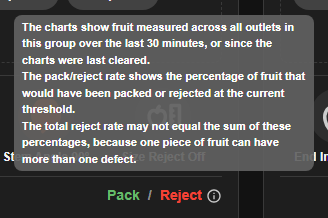
Figure 18 — The explanation beside the Pack / Reject key
Hover over or click the ⓘ beside the Pack / Reject key for a short explanation of what the charts show. Each defect is counted on its own, so a fruit can count towards more than one defect's reject figure, and the reject figures do not add up.
| Chart shows | Meaning |
|---|---|
| Insufficient data | Too few fruit have been measured to display that defect yet. Once enough data has been collected, the chart appears. |
| Charts appear once an outlet is in this group. | The group has no outlets assigned to it. |
| The charts could not be read. | The measurements could not be fetched. The thresholds can still be set. |
¶ Clearing the charts
Choose Clear charts from the group's menu to start the charts afresh. This is particularly useful after a variety change. Clearing takes effect immediately and does not affect the machines or their settings.
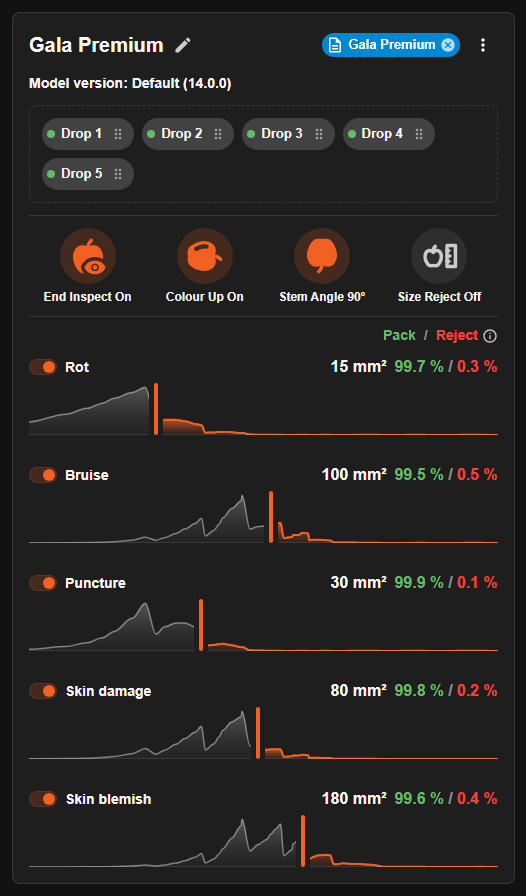
Figure 19 — Charts after Clear charts
After a clear, the charts are empty and fill back up as fruit data is collected. They are sparse and uneven at first, and take their usual shape once enough fruit has been measured.
¶ Model version
Each group runs a defect model: the software on the RAP that finds defects in the fruit. New versions of the model are released from time to time. You can choose which version each group runs, for example to try a new version on one group before using it everywhere.
The version a group runs is shown under the group name:
- Model version: Default (14.0.0) means the group follows the default version, which is currently 14.0.0.
- Model version: 13.1.0 means the group stays on version 13.1.0.

Figure 20 — The model version shown on a group card
¶ Choosing a model version
- Open the group's menu (⋮) and choose Model version….
- Click the Model version box to open the list of versions.
- Pick a version. Its release date and release notes appear underneath, so you can see what is new in it.
- Click Use this version.
- Click Deploy to send the change to the machines.
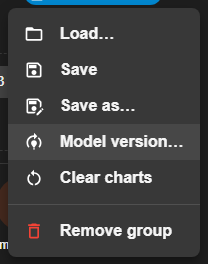
Figure 21 — Model version… in the group menu
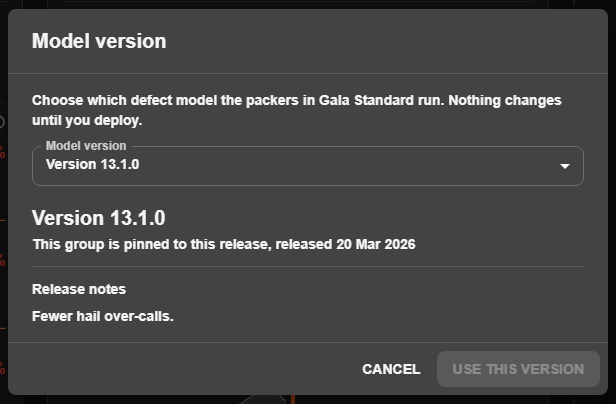
Figure 22 — The Model version dialog, showing the version the group runs and its release notes
Choosing a version is a draft change, just like loading a template. Nothing changes on the machines until you click Deploy. Use this version stays greyed out until you pick something different from what the group already has. Cancel closes the dialog without changing anything.
¶ The options in the list
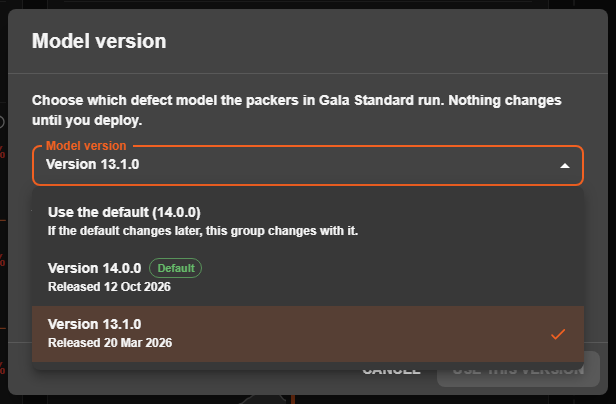
Figure 23 — The list of model versions
| Option | What it means |
|---|---|
| Use the default (14.0.0) | The group runs the default version. If the default changes later, the group changes with it. |
| Version 14.0.0 with a green Default tag | The version that is the default right now. Picking it is the same as picking Use the default: the group follows the default, and does not stay on 14.0.0 if the default changes. The dialog tells you this when you pick it. |
| Version 13.1.0 (any other version) | The group stays on this version, even if the default changes later. |
A tick shows the option that is currently selected.
If no default has been set, the first option reads Don't pin a version instead. Each packer in the group then keeps running the model it already has.
A version marked Retired is no longer offered. It only appears in the list if the group is still using it.
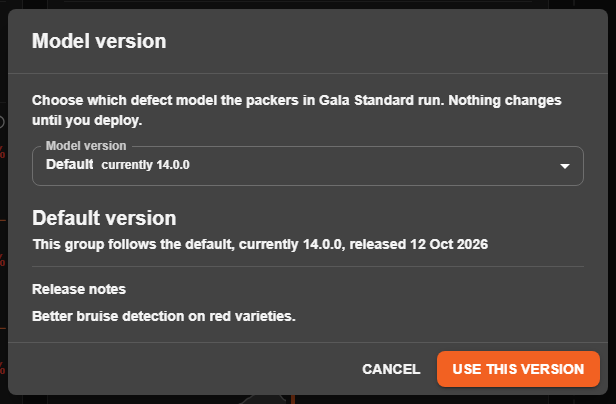
Figure 24 — The dialog after choosing Use the default
¶ Checking the change before deploying
A model version change is listed in the summary of changes like any other setting. The Model version row shows the version the RAPs run now and the version that will be deployed.

Figure 25 — A model version change in the summary of changes
¶ Common Workflows
¶ Set up a group for a new variety with a template
- Open the group's menu (⋮) and choose Load….
- Select the template for the variety and grade, e.g. Gala Premium, and click Load.
- Adjust any thresholds on the card for today's fruit.
- Click Deploy, check the summary, and confirm.
¶ Move an outlet to another group
- Drag the outlet's chip into the other group's outlet area.
- Click Deploy. The summary shows the settings the RAPs will change to.
- Confirm.
- The status dot turns green once the RAP reports back with its new group's settings deployed.
¶ Update an out-of-date RAP
- Click the orange chip to see what differs.
- Click Deploy and confirm. The group's settings are deployed to the RAP.
¶ Try a new model version on one group
- Open the group's menu (⋮) and choose Model version….
- Pick the new version, read its release notes, and click Use this version.
- Click Deploy, check the summary, and confirm.
- To go back, open Model version… again, choose Use the default, and deploy.
¶ Save adjusted settings as a template
- Open the group's menu and choose Save to update the template, or Save as… to create a new template.
- For Save as…, enter a name and, optionally, a description of your settings, and save.
¶ Troubleshooting
¶ An outlet stays orange after deploying
Check the message shown after deploying. If it says Not deployed to that RAP, the reason follows. If it was deployed, wait a few seconds for the RAP to report back. If it stays orange, click the chip to see which settings still differ.
¶ Deploy is unavailable
When the Deploy button is greyed out and its tooltip reads No changes to deploy, nothing has been edited and every RAP is up to date. If a banner says another user has made changes, reload the Settings page before deploying.
¶ Charts show "Insufficient data"
Not enough fruit have been measured on the group's outlets in the last 30 minutes, or since the charts were cleared.