When something needs attention, the operator screen shows it in the alarm banner at the top of the screen. Most alarms clear by themselves once their cause is fixed; the sections below say how to recover from each one. If an alarm cannot be cleared this way, contact your Hawk Technology service technician.
¶ The alarm banner

Figure 1 — The alarm banner
- Level – A yellow warning sign is a warning. A red sign is a soft stop, which brings the machine to a controlled stop, or a critical fault, which stops it at once. An hourglass means the machine is waiting for fruit or trays.
- Title – What has happened.
- Cause – Why, or which part of the machine it concerns, when the alarm has one.
- Action – What to do, when the alarm has one.
- More – How many other alarms are active. The banner always shows the most serious one first.
Tap the banner to list every active alarm, with its level and its hardware code. Quote the code when you contact your service technician.
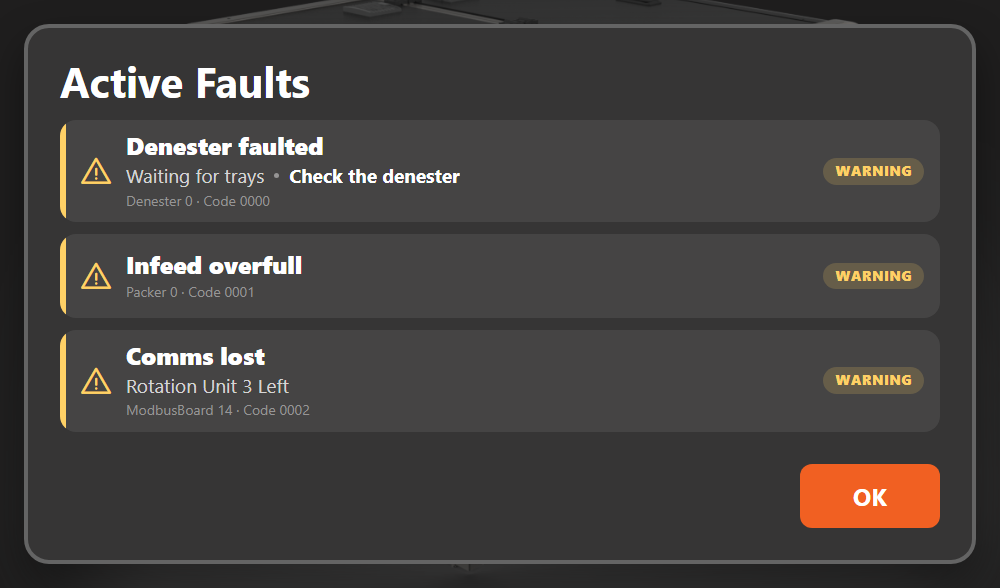
Figure 2 — The active faults list
¶ Alarms
Each section is named with the alarm's title as the banner shows it; the banner's action line, where there is one, is in italics.
¶ Supply
¶ Waiting for trays
Cause: The tray belt has no trays or is inhibited by external equipment.
Recovery Procedure: Check the denester and tray belt are working correctly.
Packer Actions: The sizer is inhibited after 10 s; packing resumes automatically when trays arrive.
¶ Denester faulted, Denester fault
Check the denester
Cause: The denester is offline or faulted. While trays are short the cause line reads Waiting for trays.
Recovery Procedure: Fix the denester fault.
Packer Actions: The sizer and tray belt are inhibited until the denester is ready.
¶ Inserter faulted, Inserter fault
Check the inserter
Cause: The inserter is offline or faulted. While trays are short the cause line reads Waiting for trays.
Recovery Procedure: Fix the inserter fault.
Packer Actions: The sizer and tray belt are inhibited until the inserter is ready.
¶ Denester and inserter faulted
Check the denester and inserter
Cause: Both the denester and the inserter are offline or faulted.
Recovery Procedure: Fix both faults.
Packer Actions: The sizer and tray belt are inhibited until both are ready.
¶ Infeed and trays
¶ Infeed overfull
Cause: Fruit buildup on the infeed and sizer cross belt.
Recovery Procedure: Reduce the rate of fruit arriving at the machine and allow the machine to pack out the current fruit. If the machine is packing at a lower rate than expected, check for conveyor or fruit jams.
Packer Actions: The sizer is inhibited until the infeed clears, then resumes automatically.
¶ Invalid tray row
Check for unusual tray layout, jog conveyor if required
Cause: An invalid tray pocket combination has been identified.
Recovery Procedure: Check that trays in the machine are valid, undamaged, and not overlapped. Jog the tray conveyor if needed, then start the machine. If the issue continues, contact your service technician.
Packer Actions: Critical stop. Operator must review the tray.
¶ Tray zone overheight
Cause: An object is too high in the tray zone.
Recovery Procedure: Check for foreign objects, double-stacked fruit, or misplaced fruit in the tray zone. If necessary, open the door to remove fruit, then close it again to resume packing.
Packer Actions: Packing is paused until the overheight condition is cleared. If it persists, the alarm becomes a soft stop.
¶ Unreachable pockets
Check for unfilled pockets out of the robot's reach
Cause: Pockets have been detected outside the maximum robot placing position.
Recovery Procedure: Fill tray pockets with fruit in the tray zone. If the issue persists, contact your service technician.
Packer Actions: If configured, critical stop; the operator must correct the tray location.
¶ Safety
¶ Safety tripped
Check external e-stops, then reset
Cause: The safety circuit has tripped: an emergency stop was pressed or a door opened and has since been cleared, or an external safety circuit is active. The cause line reads Safety circuit.
Recovery Procedure: Clear the cause, checking any external e-stops, and press the blue reset button.
Packer Actions: Critical stop.
¶ E-stop safety tripped
Release the e-stop, then reset
Cause: An emergency stop is pressed.
Recovery Procedure: Release the e-stop and press the blue reset button.
Packer Actions: Critical stop.
¶ Door safety tripped
Close the door, then reset
Cause: The door is open.
Recovery Procedure: Close the door and press the blue reset button.
Packer Actions: Critical stop.
¶ E-stop and door safety tripped
Release the e-stop, close the door, then reset
Cause: An emergency stop is pressed and the door is open.
Recovery Procedure: Release the e-stop, close the door and press the blue reset button.
Packer Actions: Critical stop.
¶ Door open
Close the door
Cause: The door is open, on a machine without a safety controller.
Recovery Procedure: Close the door.
Packer Actions: The machine stops; it resumes automatically when the door is closed.
¶ Robot and rotation units
¶ Servo fault
Cause: A robot servo has faulted or lost communication. The cause line names the axis and node, then what happened: a fault code, Comms lost, Incorrect firmware or Drive fault persists.
Recovery Procedure:
- A fault code: check that the robot actuators are not damaged and that fruit is not misplaced in the tray zone, then start the machine.
- Comms lost or Drive fault persists: open the door to de-energise the robot, reset the safety and restart the machine.
- Incorrect firmware: contact your service technician.
If the issue continues, contact your service technician with the axis, node and code.
Packer Actions: Critical stop.
¶ Missed pick
Cause: The robot did not pick a fruit from the rotation unit the cause line names.
Recovery Procedure: An occasional missed pick needs no action. If it repeats, check that rotation unit's vacuum cup and vacuum filter (see Maintenance), then contact your service technician.
Packer Actions: Warning only.
¶ Communication and devices
The cause line names the device: a camera (for example Centre Set IR1), a control board (for example GPIO Board or Rotation Unit 3 Left), or the CAN Device.
¶ Comms lost
Cause: Communication with the named device has been interrupted.
Recovery Procedure:
- A camera: contact your service technician.
- A control board or the CAN device: open the door to de-energise the robot, reset the safety and restart the machine. If the issue continues, contact your service technician.
Packer Actions: For a camera, the corresponding two rotation units stop packing until the camera recovers. For the CAN device, a critical stop. For a board, a warning, or the machine will not run.
¶ Wrong link speed, Not detected
Cause: The named camera is connected at the wrong speed, or cannot be found.
Recovery Procedure: Contact your service technician.
Packer Actions: Critical stop.
¶ Incorrect firmware
Cause: The named board's firmware is out of date.
Recovery Procedure: Contact your service technician.
Packer Actions: The machine will not run.
¶ Vision system failed
Cause: The vision system has stopped working.
Recovery Procedure: Contact your service technician.
Packer Actions: Soft stop.
¶ Other faults
¶ Packer fault, Safety fault, Device fault, Unknown fault
Cause: A fault with no specific alarm. The code in brackets identifies it.
Recovery Procedure: Note the code, and contact your service technician.
Packer Actions: Critical stop.
¶ Failed to start
If the packer software cannot start, the screen shows Failed to start in place of the operator screen.
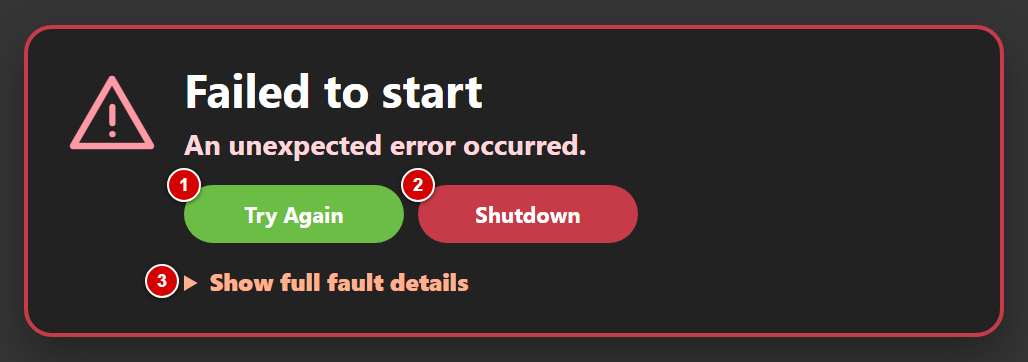
Figure 3 — The packer software failed to start
- Try Again – Restarts the packer software.
- Shutdown – Shuts down the packer's PC.
- Show full fault details – Shows the technical details of the failure. Read them out, or photograph them, when you contact your Hawk Technology service technician.